IT WORKED!!!! KINDA!
So how about them apples?
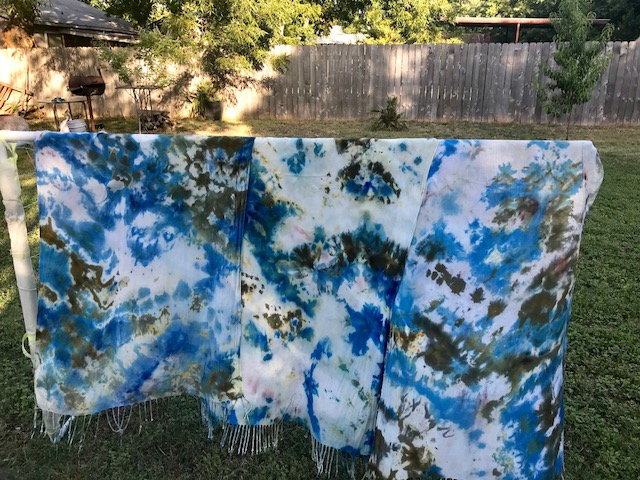
So my 24 hour experiment in ice dying with the use of soda ash… rousing success. Aside from the unpredictable nature of the dye itself that is. Let’s be clear- those colors SHOULD have been true blue, black, olive green, and yellow. And we ended up with torquoise, brown, black, pink, a few yellows, and on the 4th one (not pictured, but a gauzier fabric so was already dry and was pulled off the rack at the time of the picture) spots of neon orange.

The products, even the cocktail salt, are all ordered on Amazon. I can do without a salted rim most of the time but I’ll have to save some for Chiltons. Normal table salt is fine and cheaper, I just ran out
But lord above, I think this whole thing might work out after all. Interestingly, even though all of these fabrics are synthetic and blends, it’s the natural fiber dye that’s working best. And, of course, most of the dye in the stash is iDye Poly instead of just the iDye powder. Sigh.
So here are the steps that led me to this last go round. Make sure your fabric is prewashed. I just tossed all the scarves and bandanas in the washer and washed with regular detergent.
Step One: Brain Folds

Brains!!!
So I watched a video of a dyer who said the more folds in the fabric the more interesting the ice dying comes out. She said she tries to aim for a brain folds look, which seemed easy enough to emulate. The edges of that ol’ garage sale dish drainer have large holes on the corners so I prop it up with some scrap pieces of 4x4s from when we installed the fence extension. I’m a LITTLE concerned I put too many scarves in this batch and the whole thing might be too tight for the dye to work down… Only one way to find out.
Step Two: Saturate

Action Shot
So I totally soaked it with water. Some people get the scarves wet before the folding into place stage, but this seems easier to me. Also, maybe some dry spots will be more interesting. And this keeps me from getting soaking wet myself.
Step 3: Sprinkle with soda ash and salt. More than you’d salt food for both by about 4 times, but no clumps.
Step 4: Sprinkle on dye powder over surface. Particular colors in spots, some overlapping, but not to much- you don’t want muddy colors. So I hear.
Step 5: Sprinkle on more soda ash and salt. I also poured on the dye activator liquid, which as far as I can tell hasn’t done anything yet, but I might as well use it.

Im using way more dye powder these days than I was before watching other people do it on tutorials.
Step 6: Top with ice, evenly cover surface with about an inch or so depth.

Collaborate and listen
Step 7: Wait 24 hours.
Tonights batch (the pictures used in the steps above) are Black (was in the natural fiber dye sleeve, but I may have mixed up the bags to sleeves.. or the black from the experiment yesterday was poly dye… I don’t even know anymore.) Poly purple, all the rest of the poly turquoise that has come out denim blue in the past, and a few dots of the brilliant blue natural fiber dye that turned out turquoise yesterday. I went heavier with the black and purple.
Yesterday I only did four scarves, tonight I went with six and two bandanas, but three were gauzy scarves, including the first two I was experimenting on. The poor ugly ducklings are pretty stiff with salt at this point. Fingers crossed for some swans out of those two on the third try.
Now we wait and see. This part kills me…

One thought on “IT WORKED! Ice Dying”
Comments are closed.